How to Convert CSV to QFX Quickly and Easily
Converting a CSV file to QFX can be a tricky task - unless you have the right guidance. With this guide, we'll show you how to efficiently and accurately make the conversion. We'll also help you understand what makes a QFX file so special, and how it could benefit your needs.
Install the Right Software for Your Files.
Before you can make the conversion from CSV to QFX, you’ll need to install some software. There are several programs available that are specifically designed for converting files from one format to another. Make sure you select a program that is able to convert your chosen file type; some programs only work with specific file types, while others can handle a more general range of conversions.
Use the ProperConvert app to convert CSV/Excel to QFX format. Other formats are supported as well.
Once installed, you’ll be able to easily open and edit your files in no time.
Convert the CSV File to QFX Format.
To convert a CSV file to QFX, you'll need to open the file in the conversion software. Once opened, select the “Convert” option from the menu bar and choose “QFX” as your output format. Your software will then create a new QFX version of your file in the same folder where you saved your original CSV file. With this new version of your file, you can then upload or otherwise use it as needed.
- ProperConvert extracts transactions data from CSV/XLS/XLSX files. It creates QFX files ready to import into Quicken Classic.
- No data entry: convert data you already have in bank or credit card transactions data file format to the QFX format
- Smart: ProperConvert understands many layouts. It finds columns like date, amount, description, etc. of your transactions data.
- Easy to use: Converting your banking transactions data into QFX files could not be any easier. In a few clicks, you will have all your transactions data converted to importable by Quicken 2021-2024 format in no time at all.
- Free trial and support: try it for Free before you buy and receive full support before and after you order.
- Safe to use: ProperConvert converts all your banking transactions data on your computer.
Review the Conversion Results and Verify Data Accuracy.
Once the CSV to QFX conversion is complete, it's important to review the converted file for accuracy. To do so, open your new QFX file and check that all data fields have been accurately transferred. Verify amounts and account numbers, as well as other data points, to ensure that the information remains intact during the transition from CSV to QFX. If a mistake was made or something is incorrect then you can make the necessary corrections before saving and uploading it.
- Select a CSV/XLS/XLSX file with transactions data and review extracted data
- Backup your accounting software file before importing any file
- Click Convert to convert CSV/XLS/XLSX to a QFX file
- Import created file to Quicken Classic (Windows or macOS)
Always Backup your accounting software company data file
Before importing any files into your accounting software, make sure to backup your company data file. Apps like Quicken provide easy to use and fast backup options that will take a few seconds and save you lots of lost time in case of incorrect import. Import data with confidence you can easily rollback to previous state. Do backups for major changes like disabling online services as well.
Import Your Newly Converted QFX File in Quicken or Other Financial Application.
After you convert your CSV to QFX, you now need to import the newly converted files in Quicken or the financial management software of your choice. To do this, open up your application and click on "File" followed by "Import." Then select the option "Web Connect" or “QFX File” and then choose the newly converted file from its location on your computer. Once done, click “OK” and your imported transaction should now appear in your financial account.
Enjoy Access to Comprehensive Finance Management System With Accurate Data In Quicker And Easier Way Than Before!
With the help of this process, now you’re able to enjoy the benefits offered by your finance management software without worrying about inaccurate data. This process enables you to access accurate data in a more efficient, quicker and easier way than before. Now all you have to do is update the new file with latest transactions data instead of uploading CSV files again, which would take more time and double check for accuracy.
Why should I trust ProperConvert?
- It runs and processes your files on your computer
- It does not send your transactions data anywhere
- Please check our product testimonials
- If I need any help with conversion, can you help me?
- Free support is available before and after the purchase
Can I try before purchasing?
- Yes. The app is free to download and try.
- Your file will be fully parsed in the trial mode, so you can verify that CSV2QFX understands your transactions data file correctly.
- You can create a fully functional and loadable QFX file before purchasing (with limitation to 10 transactions data - this limitation is removed after you register).
Example: How to Use the converter to convert CSV to QFX
This tutorial shows how to use CSV2QFX utility. IMPORTANT: CSV2QFX is now replaced with the ProperConvert app, which converts from more formats and converts to more formats.
Step by step instructions
Once downloaded and installed, start CSV2QFX. Read the welcome message that provides the main points about the conversion process.
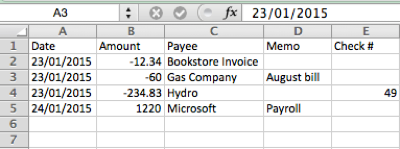
Select a file with transactions data that you would like to convert. It could be CSV or Excel file for bank or credit card transactions data.
Review transactions data before converting, make sure dates are correct, expenses are negative, and payments to the account are positive.
Set the Account ID and Account Type. The Account ID must be digits only. You can enter the actual account number or credit card number, or a shortened number. It is important to use the same number when you convert multiple files for the same account, and use a different number, when you start converting for another account.
For example, let's start with the first file for a checking account. Convert the first file and use Account ID as 10000001. Then you convert a second file for the same checking account, keep the same Account ID 10000001.
Then you start with a credit card account. For the first file for the credit card account, change the Account ID to another number, for example, 10000002. For the second file for this credit card account, keep the Account ID as 10000002.
When you start working with another account, make sure to adjust the account type as well.
The Account Type is important to set as Quicken allows you to import created QFX file for a credit card account only into a credit card account in Quicken and for a QFX file for a checking account, Quicken imports this file only in a bank account.
For the Quicken US edition, the currency must be US Dollar, for the Quicken Canadian edition, the currency can be US Dollar or Canadian Dollar.
INTU.BID value is another important parameter to set. This value defines the bank label you see during QFX file import in Quicken. This value does not have to match your account name in Quicken, but it has to be allowed by Quicken bank.
Some users do want the name of the bank to match the bank name in Quicken, and you can do this by selecting the appropriate INTU.BID value. But if your bank is not listed or not allowed, you can easily use any other bank label.
INTU.BID value applies to the account type. Some INTU.BID values are allowed for certain account types only.
Click the 'Lookup' button to see the list of banks.
Search for your bank. Make sure the bank label you choose is allowed for the account type you need to convert.
For example, if you are converting transactions data for checking, savings or credit line (not credit card) account types, the bank label must be marked as "CH". For credit card accounts, it must be marked as "CC". The bank labels allowing both types are marked as "CH,CC".
For example, INTU.BID value 03000 can be used for checking, savings, credit line, credit card, almost all account types.
Set the “Open after save” checkbox if you would like the software installed on your computer to open the created QFX file. If you have Quicken installed, it would be Quicken to open this QFX file.
To make actual conversion, click the 'Convert' button, and confirm the filename and the file location.
If you have "Open after save" checkbox set, the QFX file will be created and Quicken should open and start importing created QFX file.
To import the created QFX file manually, in Quicken, click File, File Import, Web Connect (.QFX) file. Select the created QFX file.
The next step would happen for both automatic or manual QFX imports:
- Select 'Create a new account' or 'Link to an existing account'.
- Click the 'Import' button.
- Transactions data are imported. Click the 'Accept All' button.
- Transactions are inside Quicken.
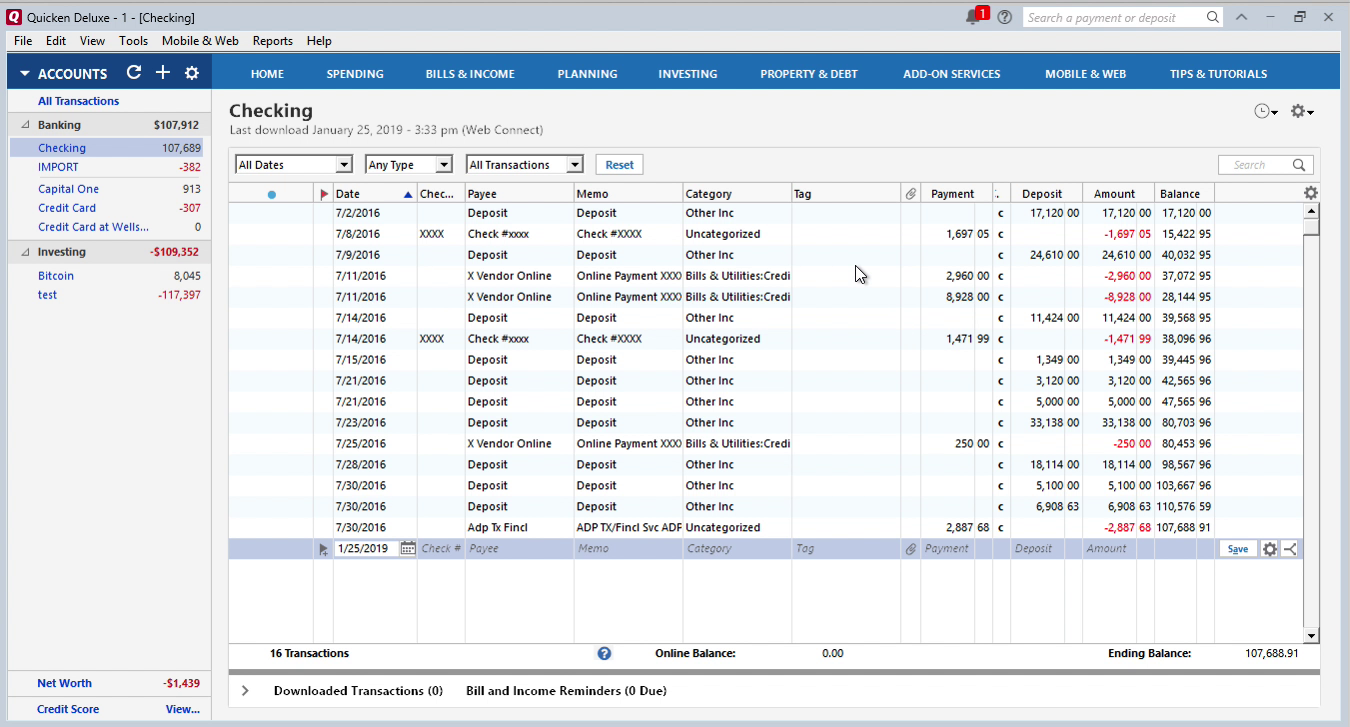
Import created QFX file into Quicken for Windows
Now the QFX file is created, let's switch to Quicken and import created QFX file. Before importing a QFX file make sure to backup your data. To import a QFX file, select 'File' - 'File Import' - 'Web Connect (.QFX) File', select created QFX file.
Import into a new account or existing account (disconnect the account before importing). Then click the 'Import' button. Then click the 'Close' button.
All transactions data are imported here, they showed in the bottom part. You can review transactions data and use Renaming Rules if you like. Then click 'Accept All transactions'. They are accepted and listed in Quicken.
You need to disconnect the account before importing from direct download to import QFX files into that account. For Quicken there is an easy way not to touch that account, just import into the new account (called "IMPORT" in this case). And have an actual account untouched:
- Click 'Tools' - 'Add Account'.
- Select Checking account.
- Click 'Advanced Setup'.
- As you don't want to mess up your existing setup and connection, Click on 'I want to enter my transactions manually'.
Once the QFX file imported under a new proxy account, you can review transactions data under this account, like a special isolated place in Quicken. Once you reviewed imported transactions data, move them to the account where they should be:
- Select the transactions data (click first one - hold 'Shift' button - click the last one)
- Right-click and choose 'Move transactions'.
- Select an account where the transactions data should be moved and click 'Ok'.
Now the transactions are under the 'Checking' account. You can delete the 'IMPORT' account or keep importing other files there.
Let's review another example. For example, let's say you have another one 'Credit Card' account:
- Click 'Tools' - 'Add Account'
- Select 'Credit Card'
- Click 'Add Manual Account'
- Click 'Next'
- Click 'Finish'.
Convert again: click the 'Convert' button - create a new QFX file - import sample.qfx file.
Select 'File' - 'File Import' - 'Web Connect (.QFX) File', select created QFX file. We didn't change the Account Name. The second time you import the QFX file, with the same Account ID, Quicken will see an established link and just import transactions into the 'IMPORT' account.
You can select transactions, move them to one of two accounts or your existing account. Click the first one - hold the 'Shift' button - click the last one. Then right-click - 'Move transactions'.
Just move your transactions to another account. This way you keep all those things unchanged and you have all your transactions. Select the account and click 'Ok'.
Now the transactions are under the 'Credit Card' account.
Import created QFX file into Quicken for macOS
Now the QFX file is created, let's switch to Quicken and import created QFX file. Click 'File' - 'Import' - 'Bank of Brokerage File (OFX, QFX)', open sample.qfx file we have just saved.
Data Account ID in the converter shows us the type of account. Usually, we convert for the 'Checking' account. So you select a 'Checking' account.
We can add a new Quicken account. This will be a new Account Name.
Or we can link to the existing account and just select a link. And then we click the 'Continue' button.
We see all transactions data imported.
There is no category. This category is assigned by Quicken. This is not from the CSV file. QFX files do not have categories. You can change the category. And Quicken will use that choice next time you import.
Learn More
- QFX - What is QFX file/format and how to open it?
- OFX - What Is OFX File Format and How to Open it?
- Quicken - How To Import QIF or QFX into Quicken
Related articles
- Convert CSV/Excel to QIF and import into Quicken, Banktivity, MYOB #quicken
- What are OFX, QFX, QBO (Web Connect) files?
- How to Convert Bank Statement PDF to CSV
- Convert PDF to QFX and import into Quicken Classic
- Convert PDF to QIF and import into Quicken Classic, Banktivity, YNAB, MYOB
- How to Convert QFX to CSV or Excel
- Convert QIF to QBO and Import into QuickBooks