How to convert to Quicken compatible formats (QIF, QFX)
See below which format your Quicken imports and convert your files to this format (QFX, QIF or CSV Mint). In case your Quicken imports both QIF and QFX files, either format has issues and advantages. The same applies to QFX and CSV Mint files.
Use the ProperConvert app to convert your file to a format compatible with Quicken.
Which file formats does Quicken import?
Quicken for Windows
- QFX (web connect) format ( Quicken for Windows 2020 or later)
- QIF format (all Quicken for Windows versions)
Quicken for macOS
- QFX (web connect) format ( Quicken for Mac 2020 or later)
- CSV Mint format ( Quicken 2015 or later for Mac or macOS)
All Quicken versions are supported
- For Quicken for Windows, convert to the QIF or QFX format if you have Quicken 2021-2024.
- For Quicken for Mac, convert to the QFX format is you have Quicken 2021-2024.
- For older Quicken for Windows versions, convert to the QIF format.
- For older Quicken for mac versions, convert to the CSV Mint format.
QIF transaction files are easily imported by Quicken (please make sure to your QIF target accordingly) and allow to supply categories and tags for each transaction. The Transactions app provide easy to use mapping interface to assign categories based on payee names or manually during the conversion. QIF files have less restrictions compared to QFX file as they do not identify financial institutions like QFX files.
For QFX transactions, Quicken uses the renaming rules to assign categories during import.
How to convert files to Quicken compatible format
Use the ProperConvert app to convert your CSV, Excel, PDF, OFX, QFX, QBO, QIF, MT940 files into QIF, QFX or CSV Mint files ready to import into Quicken.
QFX vs QIF vs CSV Mint: What are the main differences importing into Quicken?
QFX vs QIF for Quicken for Windows
- QIF most likely better the QFX
- use QFX when you want to import into previously imported account automatically and do not use categories
QFX vs CSV Mint for Quicken for Mac
- QFX most likely better than CSV Mint
- CSV Mint is great when moving from another software and need to preserve categories
Speciific details
- QIF format supports categories (and subcategories) and tags, and QFX does not (Quicken offers the renaming rules feature to assign the category during import
- CSV Mint supports categories and supported on Mac only and imports into a new account only (transactions can be moved easily to another account after import)
- QIF formats for Quicken, Microsoft Money, and other software are different by their structure. The ProperConvert app allows you to create the different QIF variants by selecting the QIF target before converting.
- QIF import into Quicken before 2018 is not “officially supported” by Quicken support. Regardless of the support, QIF files import quite well for all account types. Simply follow the instructions provided on the converter help page, and your data will be imported.
- QFX format creates an “online services link” to account ID values provided on the QFX files. Make sure to enter different account IDs when converting QFX files for different accounts.
- QFX files stop importing once your Quicken version becomes three years old. You have to either buy the upgrade or start using QIF format.
Overall, for Quicken for Windows 2020+, the QIF format is somewhat easier to import than QFX. QFX format is easier if you do not need categories during import.
- QFX format can be imported by Quicken for Windows (up to three years old) and Quicken for Mac
- QIF format can be imported by older Quicken for Windows.
QIF format
What is the advantage of using QIF files over QFX files? It allows categories and, unlike with QFX files, Quicken does not require “online call home” during the import. You do not need to have Internet connection active and a firewall enabled for Quicken to go through to import a QIF file. This can come quite handy when you work and travel and do not have Internet always-on but need to with your transactions.
QIF format has many variants, make sure to select the correct QIF variant for your Quicken version or other personal finance or accounting software.
QIF format is a great format supporting categories and tags. Quicken was discouraging the QIF format until 2019, but still, all Windows versions import it fine (since Quicken 2018, the QIF file is "officially" supported).
Quicken 2005-2017 for Windows has to be at least the Deluxe version to import QIF files directly into bank or credit card accounts.
Quicken 2018-2020 for Windows imports QIF files fine.
Quicken for Mac 2015-2022 does not import QIF files. Quicken for Mac 2007 imports QIF files fine.
QIF format advantages
- supports categories and tags
- works in almost all Quicken versions (for 2017 or earlier, you need at least Deluxe edition and follow the instructions)
- works even if your Quicken version for Windows is older than three years
- does not need the Internet to import
- investment transactions are supported by the converter
- make sure to select the correct QIF target (Quicken version) when you convert to the QIF format
QIF format disadvantages
- Until Quicken 2018, QIF is not supported "officially" and there are various traps set to prevent QIF import, however, all Quicken for Windows versions do import QIF files
- For Quicken 2017 or earlier, you have to enter the account name and select a correct QIF target to create an importable QIF file
- Duplicates are not considered during QIF import
- Quicken for Mac does not import QIF files (except Quicken 2007 for Mac which works only on very old Macs)
- Quicken Essentials for Mac does not import QIF files
QIF Format Summary
QIF format is a great file format to import transactions with categories and tags. Use the converter app to convert CSV and Excel files to QIF format ready to import into Quicken 2005-2023 for Windows. Also, you can create QIF files for Quicken 2007 for Mac, and other personal finance applications like MS Money, You need a Budget (YNAB), NetSuite, etc.
Important details for a successful conversion from CSV to QIF and import into Quicken or other accounting software are the following:
- Check that expenses are negative and payments to the account are positive. Some credit card companies supply amounts on CSV files in the opposite way (expenses are positive, and credit card payments are negative). Use the “Change +/-” button on the sidebar to reverse the amount signs for the whole file in a single click
- Make sure to select the correct QIF target (which accounting or personal finance software are you importing into)
- Make sure to select the correct account type (BANK vs CCARD vs INVST)
- Make sure to enter the account NAME exactly as you have in Quicken for direct import into that account. Quicken reads the account name from the QIF file and locates the account before importing. If the account name is not found, Quicken prompts to create a new account
- Date format is ignored if QIF target is Quicken – Quicken expects only one date format and the converter uses the expected format
- Quicken 2015, 2016 does not import QIF files directly into bank or credit card accounts. Use a proxy cash account to import your transactions and then move transactions to another account.
If you have an Excel file instead of CSV (XLSX or XLS), the converter should be able to open it directly (make sure to close the Excel file in you have it opened in Excel). You may also open the Excel file in Excel, select transactions, copy them and then click Paste in the converter.
If you have a PDF file from your bank or converted PDF file to a CSV file, use the converter to convert PDF files.
QFX (Web Connect) format
QFX files are Web Connect files and do not carry categories like QIF files. Quicken categorizes transactions after import using the renaming rules or categories can be assigned by the user later. On Quicken on Mac, make sure to uncheck "Automatically improve quality of downloaded payee names and categories".
QFX format advantages
- simpler import compared to QIF files
- does not support categories and tags
- needs an Internet connection to import (Quicken does online check for the bank label on the QFX file)
QFX format disadvantages
- no categories
- Internet is required during QFX import
- Quicken account has to be "disconnected" from direct online download for QFX import and connected back after import
- investment transactions are not supported
- does not support categories and tags
- needs an Internet connection to import (Quicken does online check for the bank label on the QFX file)
Convert to the QFX (Web Connect) format
- Load a file you need to convert
- Click on the QBO/QFX/OFX tab on the right sidebar
- Set the file type "QFX (Quicken)""
Convert a CSV file into Quicken Web Connect format
Web Connect (QFX) format is a modified OFX format supported by Quicken as well as other software generally supporting OFX or QFX format.
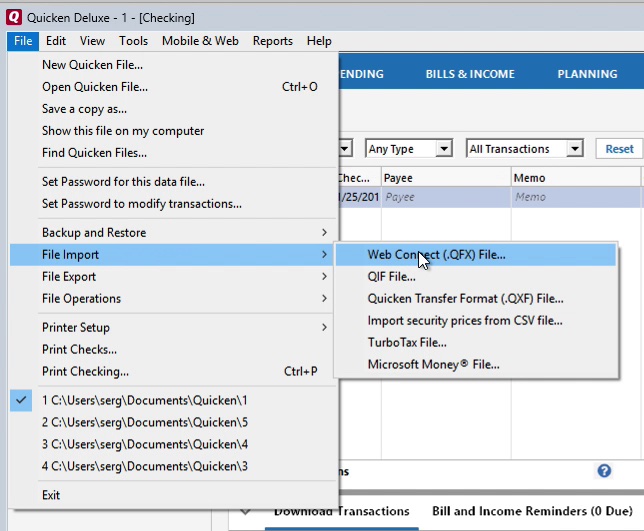
To import QFX file into Quicken, click File, then Import, then Web Connect file. And select the QFX file using a file dialog.
How to create a Web Connect QFX file if you have your transactions in CSV or Excel format? Use Bank2QFX converter to convert CSV files to Web Connect QFX format.
The converter will try to detect contents in your CSV file automatically, and then you can click the Review Mapping button to adjust assigned columns. If you create the CSV file yourself, make the first line as the column names (date, amount, payee, memo) as it will be a great help to the converter to figure out the contents of your file and automatically assign the columns for you.
Important note about INTU.BID, bank id, and account id values on the Setting tab. You can either leave them as is, select another supported bank, and enter other values for bank id and account id. Quicken will use INTU.BID shows the corresponding bank name on the import screen, but actually giving you the choice to select an existing account or create a new one. This is great confusion since the INTU.BID bank identification on the Web Connect QFX file is relevant to the account for which the import is happening. You can easily import Web Connect QFX files marked as from one bank to the actually needed account in Quicken. Simply choose the bank currently ‘supported’ by Quicken using the Lookup button and complete the import.
Quicken assigns INTU.BID, bank id, and account ID to the Quicken account (an account created by you in Quicken) after successful import calling it ‘linked online services’. You can always delete such online services by editing the account in Quicken (click on the Online Services tab), if you need to import other Web Connect QFX files with other values for INTU.BID, bank id, and account id.
During QFX import, Quicken ‘calls home’ using an Internet connection (so please make sure your firewall allows it to go through), and assigns bank details supplied in the QFX file with the selected account in Quicken. Even more, if Quicken finds the match for bank details in the QFX to details with an account, it imports data there automatically. Otherwise, it offers you the import dialog to select an existing “unlinked” account or create a new one.
If you have an Excel file instead of CSV, you can open Excel directly in the converter or open it in Excel, select all (CTRL+A) and copy to clipboard (CTRL+C). Switch to the converter and click on the Paste from Clipboard button to paste data from the clipboard. This approach saves you from creating a CSV file from your excel file. The approach also applies to other spreadsheet software supporting the copy and paste of multiple cells into the clipboard.
QFX format supplies a unique id for each transaction, and Quicken uses it to avoid import for the same transaction next time. However, when you prepare your CSV file, it is common for you may notice some transactions mistakes, so you need to fix them and import the file again. Even if you deleted the transaction in Quicken, it still refuses to import it the second time.
To deal with your need to import corrected transactions again, the converter allows to create unique transaction IDs every time you save the QFX file (this option is turned on by default), as well as keep transaction IDs consistent if you need them to be this way.
If you have an Excel file instead of CSV (XLSX or XLS), the converter should be able to open it directly (make sure to close the Excel file if you have it opened in Excel). You may also open the Excel file in Excel, select transactions, copy them and then click Paste in in teh converter.
Convert a CSV file to the QFX format and import it into Quicken 2018 for Windows:
Convert a CSV file to the QFX format and import into Quicken 2018 for Mac:
If you have a PDF file from your bank or converted PDF file to a CSV file, try PDF2QFX or Bank2QFX.
CSV Mint format
- Quicken 2015+ for Mac only
- supports categories
- imports into a new account, need to select imported transactions and drag them to another account
Quicken for Mac 2015+ has a special to import "CSV Mint" files into a new account. This is a great way to import transactions as you have easily drag transactions in Quicken for Mac 2015+ from one account to another (select multiple transactions and drag them on another account on the sidebar with the account names).
What is a CSV Mint file? It is a regular CSV file with a certain layout, which Quicken expects to be followed, otherwise, it would not import a CSV file. So just any CSV file (or even Excel XLSX or XLS file) would not work. You have to open your existing file in Excel and format it to match the column as on a CSV Mint file.
Where you can get a CSV Mint file as an example? From Mint.com (duh). You need to have some data there and export transactions and look at how data is organized and make your CSV or Excel file to follow columns and then save it as a new CSV file.
CSV2CSV does that work for you - it takes your CSV or Excel file, parses it (allows you to remap it), and saves your transactions as a CSV Mint file that Quicken for Mac 2015+ will import.
The nice thing about CSV Mint files is that they allow the category column to be supplied (but not a subcategory).
Related articles
- .OFX or .QFX for Quicken
- Common Quicken errors and how to fix them
- How to import a QIF file into Quicken
- Extract data from a Quicken QDF file
- Import investment transactions into Quicken
- How To Convert a CSV File to the QIF Format and Import Into Quicken
- Quicken 2016 is changing account currency on QFX import