Convert CSV/Excel to QBO and import into QuickBooks
To convert a CSV file to a QBO file, you will need to use a third-party conversion tool or software. There are many options available online that can help you with this process. Some of these tools are free to use, while others may require a paid subscription.
To use a conversion tool like ProperConvert, you will first need to download and install the software on your computer. Once it is installed, you can open the CSV file that you want to convert and follow the instructions provided by the tool to save it as a QBO file.
Alternatively, you can use a web-based conversion service. To do this, you will need to upload the CSV file to the website and then follow the instructions provided to convert it to a QBO file. Once the conversion is complete, you can download the QBO file to your computer.
It is important to note that not all CSV files can be converted to QBO files. The structure and formatting of the CSV file must be compatible with the QBO format in order for the conversion to be successful. If you are not sure if your CSV file is compatible, you may need to check with the provider of the conversion tool or service for more information.
Convert transaction CSV/Excel files to QBO format
- ProperConvert (CSV2QBO) extracts transactions data from CSV/Excel/XLS/XLSX files. It creates QBO files ready to import into QuickBooks.
- No data entry: convert data you already have in bank or credit card transactions data file format to the QBO format
- Smart: ProperConvert (CSV2QBO) understands many layouts. It finds columns like date, amount, description, etc. of your transactions data.
- Easy to use: Converting your banking transactions data into QBO files could not be any easier. In a few clicks, you will have all your transactions data converted to importable by QuickBooks format in no time at all.
- Free trial and support: try it for Free before you buy and receive full support before and after you order.
- Safe to use: ProperConvert (CSV2QBO) converts all your banking transactions data on your computer.
Step by step instructions to convert CSV to QBO
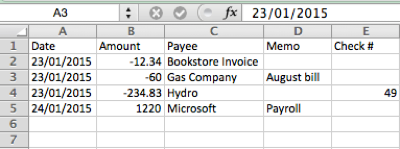
Start the converter app and a CSV/Excel file.
The CSV file has the date, amount, payee, memo, check number. In most cases, you just need to click the 'Convert' button. You still have to review transactions data to see how the converter understood your file and you have all controls to convert your file successfully.
Check if amounts are negative for expenses and positive for deposits (payments to the account). Use the "Change +/-" button once per file to revert the sign of amounts. It applied to both bank (checking/savings) and credit card accounts: expenses must be negative, payments to the account must be positive.
Set Output QBO format attributes
Converting to QBO format requires the following QBO attributes:
- Account ID (use the same number when you convert for one Quickbooks account and different numbers when you have more than one account)
- Account Type (bank or credit card)
- Currency (must be USD for Quickbooks Desktop US edition)
- INTU.BID value (must be for allowed bank label, use any allowed value if your bank is not listed or not allowed)
Import created QBO file in Quickbooks Desktop
Before importing any file in Quickbooks, backup your Quickbooks company data file.
To import a QBO file in Quickbooks, double click the QBO file and Quickbooks should import it.
If you have multiple Quickbooks versions or multiple company files, start right Quickbooks version, open a correct company file, do backup and then select File, Utilities, Import, Web Connect (QBO).
Before importing a QBO file, check the chart of accounts. The account you need to import into does not have the yellow strike icon because if you have the icon, it means the account is online linked to direct download. You need to disconnect first to import a QBO file. This is a QuickBooks requirement, not a converter requirement.
To disconnect, click 'Edit Account', then 'Bank Settings', and then 'Deactivate'. Check there is no yellow icon after the change.
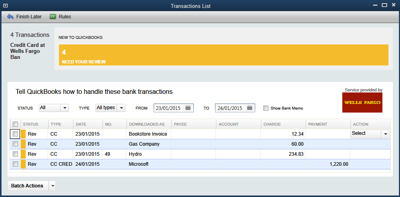
To import a QBO file, go 'File' - 'Utilities' - 'Import' - 'Web Connect file'. Then select a QBO file. Then select an existing account, and click 'Continue'. Now the data is imported. Where this data is?
It is under Bank Feeds. Imported statements show up here and review transactions data. You have to select the payee from your QuickBooks vendor records. When you choose a vendor record for payee from the QBO file (column "Downloaded As"), QuickBooks will remember your choice for the next QBO import.
Then you mark all transactions data, select expense accounts, select payee and approve and that's. The rename rule creation dialog will show up after using it for the next time.
Related articles
- Convert CSV/Excel to IIF and import into QuickBooks
- Convert QFX to QBO and import into Quickbooks
- How to Import Bank Transactions into QuickBooks Desktop
- Quickbooks Desktop Import Errors
- How to import a QBO file under an existing account in QuickBooks
- Quickbooks Accountant Batch Entry
- Convert from Excel to Quickbooks