Open/Convert a QIF file in Excel
Quicken is a personal finance management tool that offers an easy-to-use interface and powerful transaction database for creating budgets, tracking income and expenses, and monitoring your home or small business finances. It also allows you to export your data in the form of a QIF file, which can then be converted to Excel format for use in other applications or shared with an accountant or bookkeeper. You have the option to convert the entire QIF database file or just select parts of it to Excel.
When you need to export transactions from Quicken, you would have file in QIF or QMTF formats. These files can be opened in a text editor or even in Excel as a text file, but are not easy to work with. It would be better to convert such files to CSV or Excel format first.
Need to work with bank or credit card transactions stored in an QIF file but cannot open it in Excel as a table with transaction? Excel or Google Sheets or another spreadsheet app does not work with QIF files directly.
Use the ProperConvert app to convert your transaction QIF iles to CSV/Excel formats.
Convert transaction QIF files to the CSV/Excel format
- ProperConvert extracts transactions from QIF files. It creates CSV/Excel files ready to import into Excel, Quicken for Mac, Quickbooks Online.
- No data entry: convert data you already have in bank, credit card or investment transactions file format to the CSV/Excel format
- Smart: ProperConvert understands many layouts. It finds columns like date, amount, description, etc. of your transactions.
- Easy to use: Converting your banking transactions into CSV/Excel files could not be any easier. In a few clicks, you will have all your transactions converted to importable by Excel, Quicken for Mac, Quickbooks Online format in no time at all.
- Free trial and support: try it for Free before you buy and receive full support before and after you order.
- Safe to use: ProperConvert converts all your banking transactions on your computer.
Quicken Interchange Format (QIF)
QIF files are Quicken Interchange Format files containing details about transactions:
- Downloaded from your bank, credit card company, investment broker
- Created as an export file by Quicken
- Created as an export file by some personal finance software
How to view or open a QIF file
- Download and install the ProperConvert app
- Start the app and locate a QIF file
- Review transactions
- Click Save to save a CSV file and then open it in Excel (or other spreadsheet application) or click Copy to clipboard and then switch to Excel and click Paste there
Supported Account types
- Bank (Checking/Savings/Credit Line)
- Credit Card
- Investment
Export data from Quicken for macOS as QMTF
Quicken for macOS does not export transactions in the QIF format, but it exports as QMTF format. Thus format is close to QIF and the ProperConvert app supports it the same way as QIF.
Step by Step: Convert a QIF file to CSV/Excel format
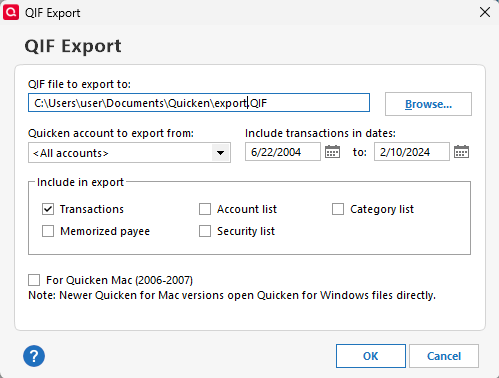
Step 1: Start the app and select a QIF file.
You can review a QIF file before converting.
If your QIF file has dates in different formats, then your system will try to figure out for you from or your expected format. If there is no way to figure it out, you can tell it by specifying how Input dates are coming on your QIF file. For example, if dates are coming as month/day/year, then you would specify. If it is slash or dash, or dot, or apostrophe, it doesn't matter ' this is just order specified, how Dates are coming. In some QIF files, they are coming without year. And if you need to specify the year, you can start that which year those transactions belong to.
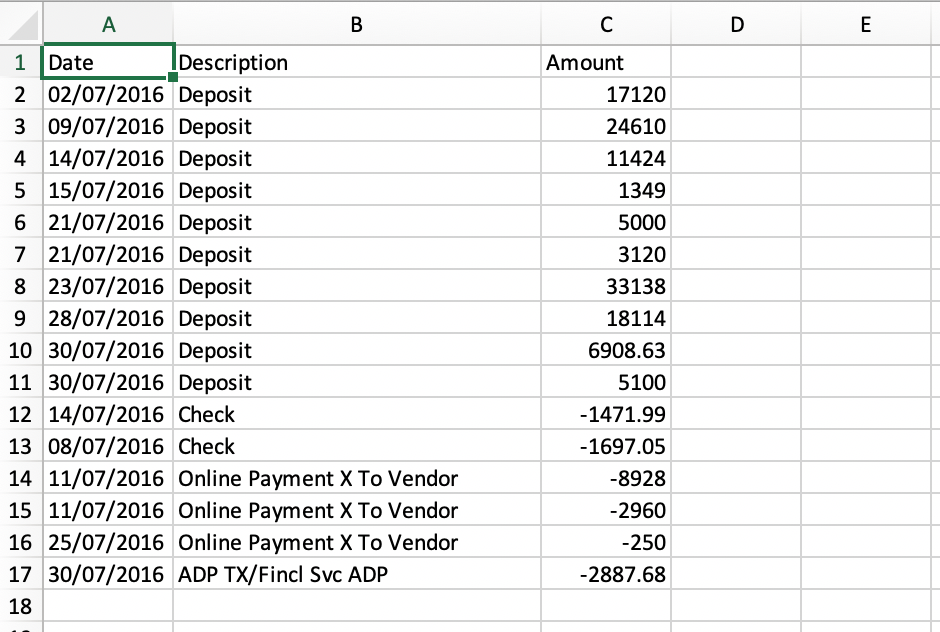
You can review all those QIF details, all those transactions details. Each transaction takes one line.
Step 2: Set output CSV parameters
The next step is to specify how you would like your CSV file to be created. It may be a CSV file, it may be an Excel file, it may be limited fields - Quickbooks Online file or Xero file, or CSV Mint file. Choose a CSV Target option.
Specify the date format for the CSV file.
Step 3: Convert to CSV/Excel and review created CSV file.
Click the 'Convert' button to create a file.
Confirm output CSV file name or change it. Then click 'Save'.
If you specify to open a file after a conversion, you can use the software associated with the CSV file. It could be Excel or Notepad for you to review created CSV file.
Conclusion
The QIF format is one few available options to export data from accounting and personal finance software. For software like Quicken, this is only the option. The QIF format is not easy to work with directly, and some accounting software may not import it. Use the ProperConvert app to extract transactions from QIF file and save them in required format like CSV/Excel, QBO, OFX and others.