Import CSV or Excel into MYOB: convert CSV or Excel to QIF
MYOB imports QIF files. Convert your CSV or Excel file to QIF first, then import it. Read the full MYOB import guide.
What is a CSV file
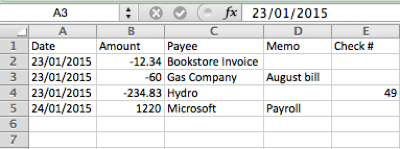
CSV (comma-separated values) is a plain text file with one transaction per row and columns for date, amount, description and other fields. Every bank and payment service uses its own column names and layout, so no two CSV files look exactly the same. An Excel file (XLS or XLSX) works the same way here.
CSV column mapping
Different CSV files use different column names. A PayPal export uses different headers than a bank export. ProperConvert detects the columns automatically in most cases. If your CSV has unusual column names or splits amounts into separate debit and credit columns, use the manual mapping option to tell the app which column contains which value. Once mapped, the app remembers the layout for the next file from the same source. See CSV column mapping.
Can any CSV file be converted?
Most bank and credit card CSV files can be converted. The file needs at least a date column and an amount column. Files that put deposits and withdrawals in separate columns, or use unusual date formats, may need manual column mapping before converting. Remove any summary rows above or below the transactions.
What is a QIF file
QIF is an older plain text format for transactions, with a line for each date, amount, payee, memo, check number and category. It has no transaction IDs and no currency. More about QIF.
Why convert CSV to QIF
A bank's CSV or an Excel file has its own columns, while QIF has a fixed line for each detail. QIF is a plain text format that apps without OFX support often import, and it can carry categories. It has no transaction IDs, so import each period only once.
Before you import: check the account in MYOB
Check that the account exists and which periods are already imported. Importing the same file twice, or statements with overlapping periods, creates duplicate transactions.
Step by step: convert CSV or Excel to QIF
- Download, install and start ProperConvert. The trial is free.
- Open your CSV or Excel file.
- Review the transactions to see how the app read your file. Check that the dates are correct, and that expenses are negative and deposits (payments to the account) are positive. The "Change +/-" button reverses the signs for the whole file, for bank and credit card accounts alike.
- Set the QIF settings below.
- Click Convert, then confirm the file name and location.
Set the QIF output settings
In the QIF tab on the right sidebar, select MYOB as the QIF target. MYOB has special requirements for QIF files, and this target meets them. It writes dates as DD/MM/YYYY. See all QIF settings.
Import the QIF file into MYOB
- Log in to MYOB, click Banking, then Bank Transactions.
- Click Import Statements and select the account to import into.
- Browse to the QIF file and click Open.
- Set "Date format if using QIF" to DD/MM/YYYY.
- Click Import now.
- Review the transactions: check the assigned account and tax code, and split transactions if needed.
See the MYOB import guide for more.
MYOB QIF questions
Why does MYOB refuse my QIF file?
MYOB has special requirements for QIF files, so a QIF written for another app fails. Convert it with the MYOB QIF target.
Can MYOB allocate transactions automatically?
Yes. You can create a rule from a transaction (payee, amount and description), so MYOB allocates matching transactions on the next import.
How do I undo an import?
Click Import Statements, then View Import History. Select the account you imported into, then click Action, Continue and Delete.